
Preface
The truth about this light is that I was initially a touch skeptical – I always LOVED the look, but… Optical programming? Really that’s just a gimmick (?). But then I looked into the driver, and realized that this thing is very cool, and the driver is made by a company I already knew and liked! I was lucky enough to get in on the second drop, the drop for the black anodized “satin black” bodies.
To add to the above: let’s be honest. This is a $500 flashlight. Most people don’t need a light this expensive even if they need some of the functionality. Owning this light is a personal preference and by no means a need. So, we’re in a judgement free zone about the desire to own this light, mmmk?
Official Specs and Features
And one useful thread.
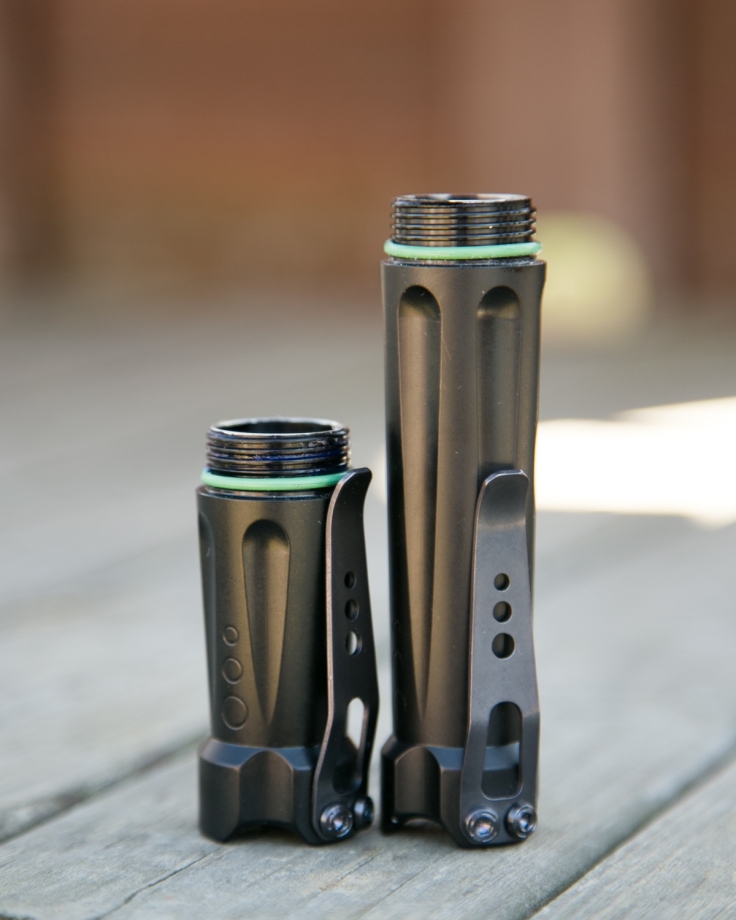
Versions
There are a number of versions of this light…. I’ll really cover this more later. But there are a number of body options (the “35” (for 18350 cells) and the “70” (for 18650 or 18350×2). The body is currently only available in aluminum, but other metals are likely in the future. There are also emitters options. In the case of the drop I purchased from, there was an XP-L HI (4000K) and an XP-L HI “Redome” (4500K). There’s also a red or amber secondary emitter.
Short Review
I like this light exactly as much as I thought I would, and then some. If this light is within your budget, I recommend picking one up if even just as a “rental” (ie, to resell later), just to check out the awesome functionality of it.
Long Review
What’s Included
- BOSS 35, BOSS 70, or Combo

Pictures
Here’s an album of photos and some beamshots. Here’s the runtime set too, but bear in mind that the programming possibilities for this light render this runtime’s usefulness a little bit murky.
Package and Manual
I believe there are two possible packages for this light but I’m only going to talk about the package I purchased. I purchased only the BOSS 35, and it came in a priority mail box. Inside this box was a section of pipe insulation, which contained the light. The light was inside a tiny Ziploc bag. I believe there’s a “higher end” package, possibly if you get the combo. It’s a nice box and…. just nicer packaging. But I can say that what I received was a nice protection for the light.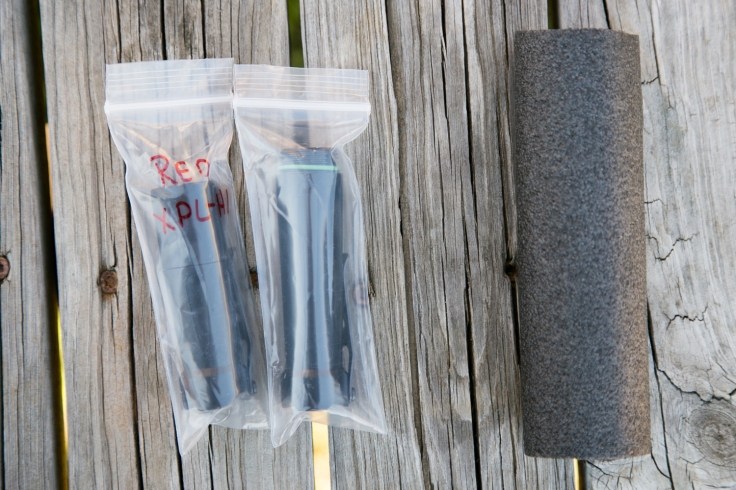
There is no manual for this light. The driver itself has a guide at the site of the maker (lux-rc.com). But there’s no paper or pdf manual strictly speaking for this light as a whole. Yet. There is one in the works…. I’ll really be interested to see it because for a light like this, it’d have to be very long to be very thorough!
I’m pretty sure this is the “nicer” package – for the first “patina” run, but this is not what I ordered so I can’t comment much on it:


Update: that package ^ was only used for Batch 1. All subsequent batches use the same packaging I received.
Build Quality and Disassembly
The BOSS is absolutely impeccably built. Part of the draw of the light is the attention to detail Oveready shows…. This light is the product of years of experience from the guys at Oveready, and while this is a new light, it’s still iterative. Oveready has older designs that predate the BOSS, and those lights led up to this one – if not in design, at least in builder experience.


I’ll add that Oveready doesn’t sell something they don’t deem perfect. There are just two guys, so I’d imagine that each one of them handle just about every light in every batch. It also may be just 2 guys, or 6 people total, or who knows – as far as I’m concerned Oveready is a mythical beast who gives birth to these awesome lights…. In any case, they tend to notice irregularities. (In fact, that’s how I got the 70 tube for my light. It was perfectly usable, but not perfect, so they chose not to sell it. When I asked for a tube for testing, that’s what they sent me (I’m 100% good with this!). Therefore: any irregularities you notice on the 70 tube in my photos are only the result of this being a free sample for testing purposes!


And of course, big, thick anodized ACME threads:


So the light is extremely well built. It’s also very possible to disassemble this light. Batch 1 of the BOSS had all tight bezels. Some users desired to change optics or whatever, but had difficulty removing the bezel – Oveready has addressed this my offering a special tool for removing the bezel. The special solid nylon wrench set can be purchased for $19, or if you’re good with strap wrenches, I have no doubt this could be done with no special tools.


The optic is a standard Carclo, and as such can be swapped between different beam profiles easily. The light ships with narrow optics, but medium and wide are available too. For later releases (with Nichia 219c for example) other optics may be good choices. But for now with the XP-L HI, the narrow is a great choices.


The activation switch is a standard format switch too – a McClicky. So it’s serviceable, should the need arise. This also means we can get to it fairly easily.
Size
At least in the case of the 70, the light isn’t really too long – It’s less than a mm longer than the Convoy S2+, which I consider a fine size for pocket carry. The 35 is long for an 18350 size light, but if the 70 isn’t too long, then of course the 35 isn’t either.

I have carried the light in the 70 format extensively, and I love the size of it. It clips nicely, and I don’t find it too large. I carry the 35 off and on, and wish for that light I wish the pocket clip was a little deeper.


Retention
There’s an installed pocket clip, and that’s the only included option. The pocket clip as shipped is extremely tight. Other users have removed the clip and stretched it a little, but I have just used mine for a month or so, and it’s just about the right amount of tightness now. Still tighter than all my other clips, but usably tight. Fortunately there’s no knurling on the light at all, so placing the clip on pants doesn’t cause any abrasion.

The clip itself is thick (1.00mm) steel. The edges are not rounded at all – that’d be a very nice touch on the back side, to protect pants pockets etc. Still it’s not very sharp.
It’s also held in place by some unusual screws. They aren’t quite Torx and they aren’t quite Hex. I think it’s some mix of the two which is supposed to allow use of either tool for removal. I haven’t actually removed the clip (and don’t plan to) but I think Torx would be my tool of choice.
Noteworthy here is that both the 35 and 70 come with their own clip. So no swapping is necessary. Each body is a complete unit in itself – there’s no need for removing the clip and changing it from the 35 to the 70 or vice versa.
It’d be a neat addition for the 35 clip to be a deep carry clip. I wouldn’t want that on the 70 body, but it’d be nice on the 35. So every 35 would have a deep carry clip, and every 70 would have the same clip that ships now. That adds some great versatility. The hole pattern on this light is a standard one; if you were so inclined, you could change the clip. I believe the Steel Flame clips fit this light, but I haven’t tried it myself (not that they’re deep carry, just proffering some options).
Power
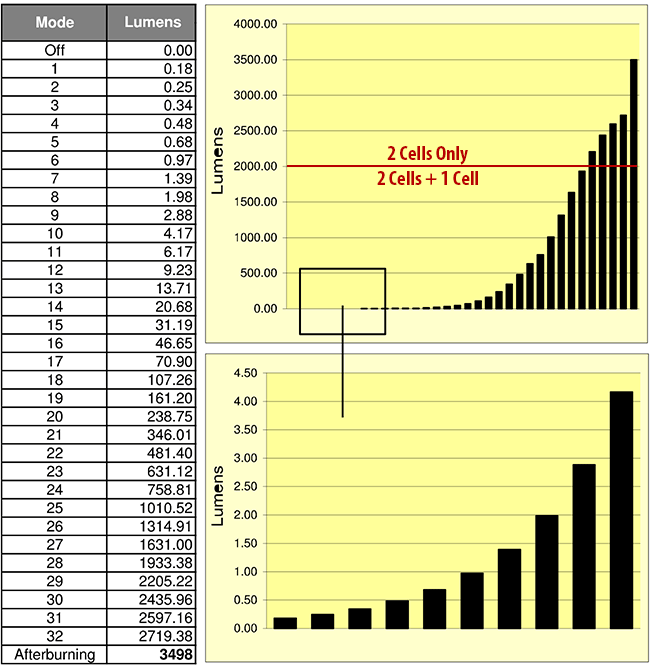
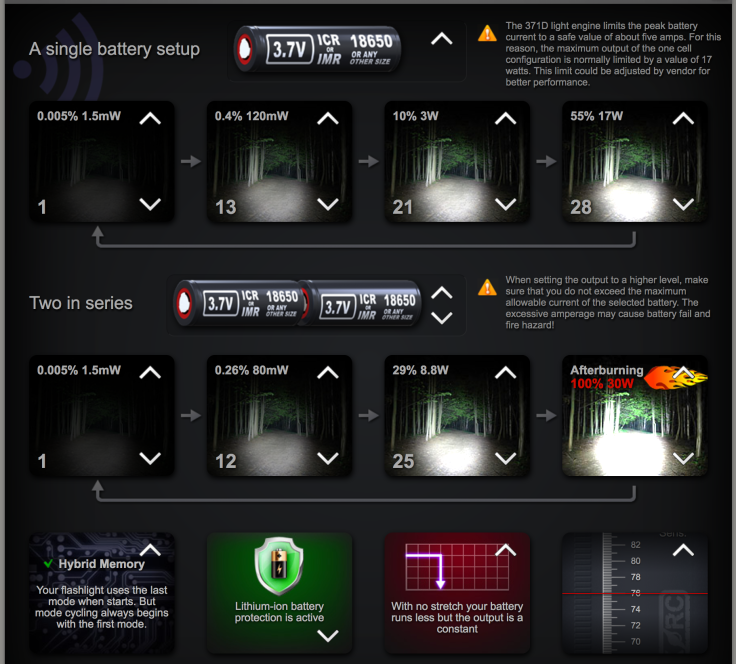
There are a number of power options. The BOSS 35 is powered by a single 18350. This configuration will allow programming up to and including the “17W” output. The BOSS 70 is powered by a single 18650. Like the 35, the the 70 + 18650 will allow programming up to and including the “17W” output level. The 70 tube also supports 18350×2. This configuration allows a few higher outputs than the single cell 17W setups, thanks to the extra voltage 2 cells provide. Here’s a handy photo of the modes, and the extra modes allowed by the 2 cell configuration.
These high output levels demand certain things from a cell… namely (particularly in the >17W modes) that the cell(s) be able to deliver 8A continuous output. Oveready recommends AW brand cells, and they’re available on Oveready.com. Those are rated at 12A output, continuous. The cells I’ve tested the light with are
- 35: Efest 800mAh 18350, rated 6A continuous
- 70 (one cell): NCR18650GA
- 70 (two cells): AWT 850mAh, rated at 10.5A continuous
And all those work just fine. Those are all unprotected.


Runtimes
I just picked a few representative options for runtime test on the BOSS, simply because the programming makes for so many possibilities for setup. Notable things you might want to know: Do 2 cells make an output difference? What does stretch and protection do? I hope these runtimes will answer your questions. Just as example of the programming, I’m attaching two photos of the two UI’s I used for the runtime tests below. The most notable and important distinction is that one uses Stretch, and one uses No Stretch.
UI/Program as follows: [image boss.rt.prot.nostretch.a]:
UI/Program as follows: [image boss.rt.prot.stretch.a]:

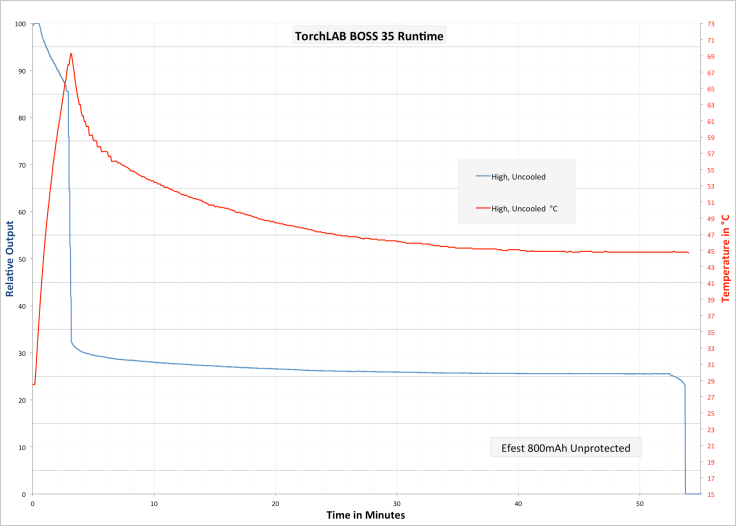
BOSS 35: Tested using Efest 800mAh Unprotected
Runtime 1 (BOSS 35 [18350], Protection, No Stretch):
- 4.19V starting voltage
- UI/Program as follows: [image boss.rt.prot.nostretch.a]
- 17W setting
- Voltage at shutoff was 3.00V
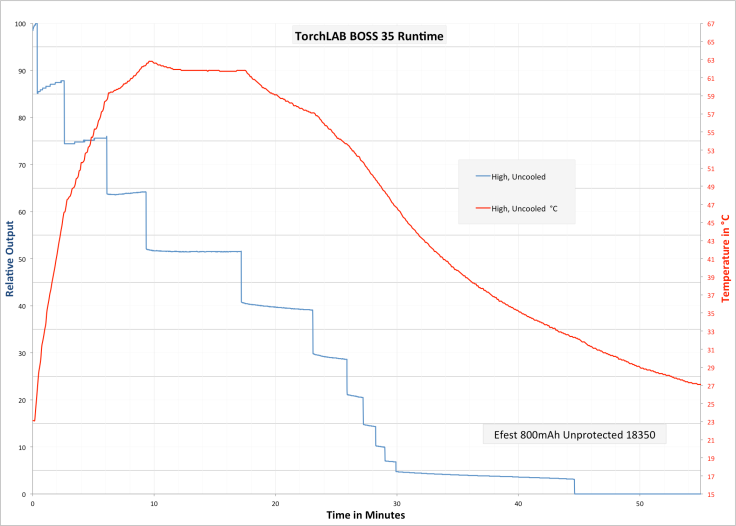
Runtime 2 (BOSS 35 [18350], Protection, Stretch):
- 4.19V starting voltage for both cells
- UI/Program as follows: [image boss.rt.prot.stretch.a]
- 17W setting
- Voltage at shutoff was 3.11V
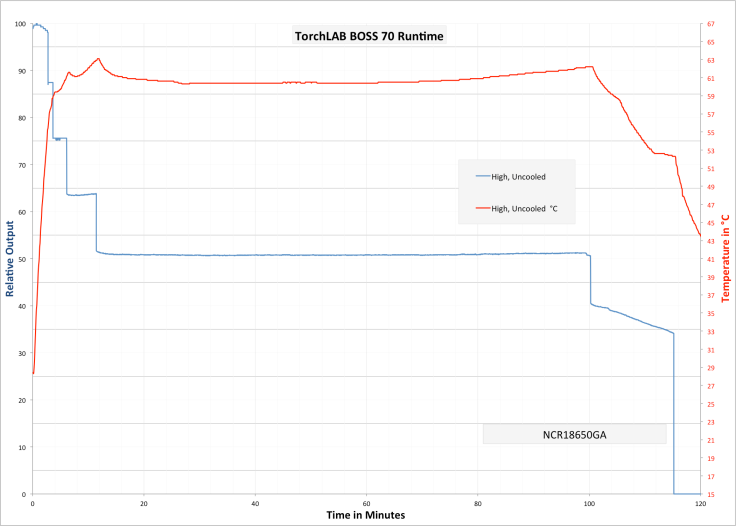
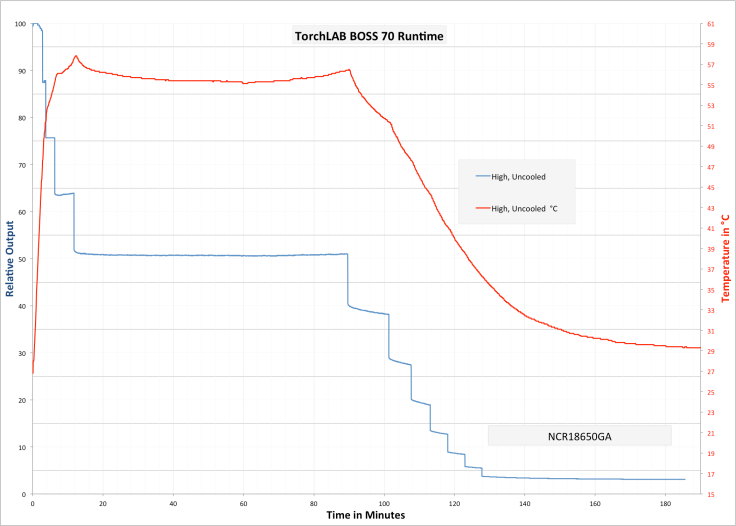
BOSS 70 (18650): Tested using NCR18650GA 3500mAh 10A Unprotected
Runtime 3 (BOSS 70 [18650], Protection, No Stretch):
- 4.19V starting voltage
- UI/Program as follows: [image boss.rt.prot.nostretch.a]
- 17W setting
- Voltage at shutoff was 2.98V
Runtime 4 (BOSS 70 [18650], Protection, Stretch):
- 4.20V starting voltage
- UI/Program as follows: [image boss.rt.prot.stretch.a]
- 17W setting
- Voltage at shutoff was 3.09V
BOSS 70 (18350*2): Tested using AWT*2 Unprotected
Runtime 5 (BOSS 70 [18350*2], Protection, No Stretch):
- 4.19V starting voltage for both cells
- UI/Program as follows: [image boss.rt.prot.nostretch.a]
- 30W setting
- Voltage at shutoff was 3.17 and 3.05V

Runtime 6 (BOSS 70 [18350*2], Protection, Stretch):
- 4.20V starting voltage for both cells
- UI/Program as follows: [image boss.rt.prot.stretch.a]
- 30W setting
- Voltage at shutoff was 3.04V and 2.92V

Of particular note with these last two runtimes (18350*2) is that they are approximately twice the output (or whatever they’re supposed to be exactly). I just failed to scale the first four graphs according to the last two. And I tried making one graph will ALL the data and it didn’t look sensible. So this is where we landed.
User Interface and Operation
There’s a single tailswitch, and it’s a forward clicky. The boot that ships with the light is a black silicone one, but this can be replaced.


I’d love to throw an orange (or gitd) switch on mine but I’ve had some trouble confirming that all the boots available out there in the wild actually fit this light ideally. Until I can, I’m sticking with black. (There is a difference of a mm or two in the “brim” (for lack of a better term) in the non-OEM boots and the fun color boots. (Editor’s note: I did end up throwing an orange boot on there, and swapping it is quite simple.)
Anyone who reads me very much knows I prefer reverse clicky lights – I love the flexibility they add. But anyone who knows flashlights knows that forward clicky UI’s are ubiquitous, as is the McClicky switch. These are good things. And just because they aren’t my favorite doesn’t mean I don’t like them.
Of course the FW clicky operates the light just the way all FW clickys operate. A half press allows mode selection, and once the proper mode is activated, completing the press turns the light on into that mode. I won’t tableize this because of the section below, regarding programming. You’ll find out why I’m told, my mother she told me so.
Programming
Here’s a video of how to enter programming mode. And here’s a video of me actually programming the light start to finish.
Programming mode is indicated by a very low output of the second emitter. It’s actually noteworthy because the programming mode uses “bad” PWM, which makes that one good way to tell if you’re in programing mode and not just in the secondary emitter model. Once in the programming mode, programming is done optically – the renowned feature. To program the light optically, the flashlight is placed on or near a screen with the “program” (a series of white flashes on a black background), preceded and followed by a green screen. In order to obtain a “program,” one must visit lux-rc and create an account (if you have to, and I think you have to). Once an account is created, click the “Program” button. There are a ton of modes and options, which I recommend you playing with if you have any interest – it’s pretty fascinating just from an engineering standpoint. There are a few notable items though.
- There’s just one programming page for all the BOSS lights (35/70, and all finishes/metals).
- The light may be programmed for one cell, two cells, or one and two cells.
- Outside of the light modes, there are four settings: Memory, Protection, “Stretch”, and “Bounce”.
- There’s one final option which is not immediately obvious in programming. Clicking the “load” option allows one to change some options: 55C Temperature Cutoff, Change programming pin to 112, Fast Switch Timing, Oveready Factory Program. This is handy and independent of other programs you might load.
- In that section (above, 4) is also where a user can save and access their own programs.
- Worth noting is that there are some settings for the driver that Oveready has locked and with this light those settings may not be changed. (These are in the “Advanced Configuration” section on the lux-rc page, and include mode timeout, temperature settings, one cell output limit, and pin reset). (That said, there are other ways to interact with a few of those options.)
- Not mentioned many places is the PIN for battery check: 111. Entered just like the PIN to enter programming (222), this mode displays the cell voltage (main emitters blink X, and secondary emitter blinks .x), ie three blinks from main emitters and 8 from secondary emitter means the cell is at 3.8V. Here’s a video of how to enter Battery check mode, and also a display of battery check in action. The cell is at 4.1V in the video.
- Speaking of PIN 222, this not only enters programming, but also flashes the serial number for a light. Grouped flashes count as one number, separated by a space, counting toward the actual serial. Ie: Flash Flash [pause] Flash, would equal 21, and so on.
And just so there’s always a hard link to their programming page (which is an issue I ran into when lux-rc.com released their newest product), here you go. I hope that one day Oveready will host a copy of the programming feature on their own site. Maybe they can even make an awesome mobile app!! Until then we’re beholden to the will of lux-rc.com, a company based in Russia.
Programs are just a series of flashes on a black background. And those programs can be saved as … files …. and accessed outside of lux-rc.com. This means a user can save a program as a photo on a mobile device, and program the light on the fly. lux-rc.com itself is accessible on mobile devices too, so programs can be written on a mobile, and the light programmed that way (this is my preferred method, in fact.) Neat sidenote: the program is a single pixel, which lux-rc blows up for use with the light. That means that the file size of the programs are small.
Ultimately the programming allows for FOUR output levels, including whatever you have the secondary emitter set to. Allows four, but doesn’t require it. You may use any number of slots, even just one. You may use any combination of primary/secondary emitters, or only the secondary if you wish. There’s no limit to the combination. The limit is that there are only four slots. Truthfully, I find this quite limiting. I wish there was at the least, a second mode group that I could access with some button magic. The driver is certainly advanced enough for it! I’d be happy if I could Even enter a PIN as is done for programming, to get to another group. Speaking of PINs, I would also love for the light to be able to tell me some of it’s settings. I’d love to be able to be reminded what the temperature setting is, or what the voltage protection is, for example. But there’s no way to be sure without essentially reprogramming the light (!!!).
The accessory options of the normal programming page are interesting. I’ll discuss a bit about them, briefly.
Memory: The BOSS can have no memory, memory, and hybrid memory. The first two you’ll already understand – and they’re completely normal with no surprises. “Hybrid” is just what it sounds: a mix of no memory and memory. Hybrid causes the light to come on in the last used mode, but then the next mode in the cycle will whatever you’ve selected for “mode 1” (not necessarily “low” or “high” – just whatever you’ve set as mode 1. Hybrid is my choice, and I really, really love it.
Protection and Stretch are fairly self explanatory.
Bounce is a very interesting feature. The light has an optical sensor and it’s nice to note that it’s leveraged for more than just programming. There’s a[n adjustable] feature whereby if the light is on in a high mode, and becomes cloaked, the bounce feature will switch the triple emitters off and the secondary emitter on. Probably designed with accidental activation in mind, this feature is actually an extremely option for intentional access to the secondary emitter. Using bounce in this way means all 4 modes can be used for primary emitter modes, which frees up a huge amount of the mode options. (At least 25%, to be exact.) Now, bounce isn’t without an issue. And this was a big issue for me, in the field. Particularly because bounce is adjustable – a lower value means bounce will trigger at a ‘less covered’ scenario. With a ‘just wrong’ bounce setting, the emitter itself can actually be bright enough to trigger bounce in a regular use scenario. If this happens, the light won’t be able to click through and advance modes to a lower mode. That’s a huge deal! When this happened to me (with the Bounce setting on a reasonable number, mind you), I was stuck in the field with an essentially useless light. And since Hybrid was enabled, removing the cell didn’t solve the problem. I had to actually reprogram the light after bringing up a program on my cell phone. So while I love bounce, I also have a huge issue with the potential for a feedback loop. Also I can say, I’m not sure I ever once have had a McClicky accidentally activate.
Before buying this light, there are a few things worth considering.
- How often will one really program a light?
- There is no way to tell what settings are when the light is on (can’t even use the site to do so)
- Site not mobile friendly (there is no mobile page, and there is no programming app)
- UI can loop on high with bounce settings poorly
And finally, optical programming is awesome. It’s exactly as awesome as I thought it would be, at the very least. I would buy the light again just because I think that is awesome. In fact I may even, if they drop a brass version with 219c as I hope they do (and I think brass is a definite – who knows about emitters). But is the programming worth the price of admission? I can say after a bit of fiddling with programming, I honestly have not modified the program once in over a month. Does that means it’s good or bad?
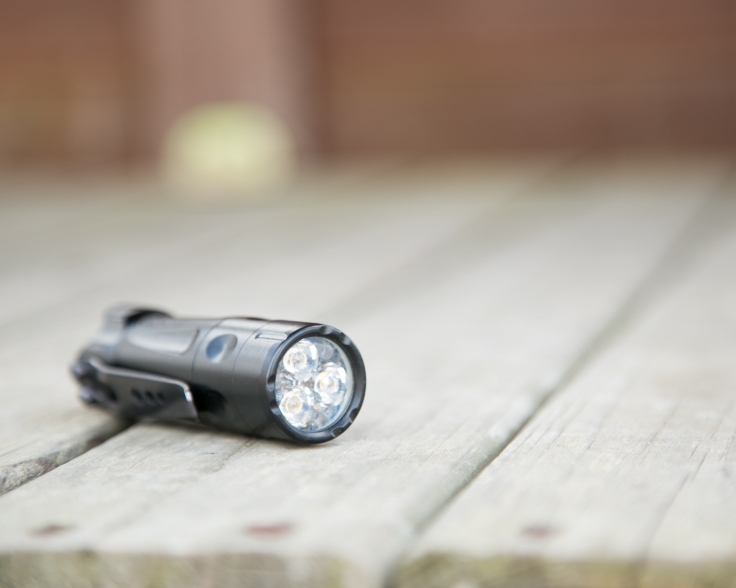
LED and Beam
My BOSS has three Cree XP-L HI emitters and one red secondary emitter. Other choices are available. The XP-L HI of choice is 4000K, which is quite warm in all honesty. I wouldn’t complain about it but it really is quite warm. I still believe it’s the best choice of the bunch.
There’s also an option for the secondary emitter: red and amber can be had. When I bought, only red was available. If I had my choices I’d go with amber for possibly no reason except novelty.
There’s a narrow TIR optic to compliment the throwy XP-L HI. I actually don’t have a huge preference here but I like the beam profile of the BOSS just fine. Since optics are so cheap, and the boss has a completely standard optic, it’s easy to buy and try other optics Floody, medium, and narrow are the other choices, and some or all of those are available as frosted. So there are plenty of choices, and the optic is very easy to change. Note that depending on how you ordered your BOSS, you may or may not need a special tool to unscrew the bezel. Some, for a short while, were shipped with the bezel tightened down so much that unscrewing them was effectively impossible. TorchLABS has designed a set of wrenches – very clever wrenches might I add – that will allow very easy removal. I bought a set both for removing my bezel, and just to quell my curiosity on what Oveready had come up with. They work absolutely fantastically, and they’re very clever to boot. What’s more, they allow easy access with zero potential for damaging the finish on the light. That was important to me and was done well.


Since I had the tool, I went ahead and ordered a “drilled optic” (one with the standoffs drilled so that they’ll accept tritium tubes/vials. So I ordered the optic and tritium (separately) and now not only does my BOSS have a glow o-ring inside the bezel, there are also three green tritium vials.


Beamshots, Runtime, and Lux Measurements
| Oveready | Boss | ||
|---|---|---|---|
| Emitter | Cree XP-L HI | ||
| Emitter Notes | Three emitters, 4000K | ||
| Cell | 18650 | 18350 | 18350*2 |
| Runtime | 18650 | 18350 | 18350*2 |
| Beamshots [0.3″, f/8, ISO 100, 5000k] | Combined album | ||
| Claimed Lumens (lm) | 2000 | 2000 | 3498 |
| Lux (Measured) | 677 | 778 | 1093 |
| At (m) | 3.136 | 2.978 | 3.226 |
| Candela (Calculated) in cd | 6657.953792 | 6899.680552 | 11374.93407 |
| Throw (Calculated) (m) | 163.1925708 | 166.1286315 | 213.3066719 |
| Throw (Claimed) (m) | – | ||
Random Comparisons and Competitive Options….
Any of the actual Lux-rc lights compare in probably the most important characteristic: programming. Since the BOSS is available with various emitters, it’s hard to compare. Worth mentioning on a strictly hardware level would be a custom built triple like the Convoy S2+, which can be had for much less, and built for much much less.
For example my custom built Convoy triple (built by u/tebeve) compared nicely AND is a reverse clicky with tons of modes more groups. And I really love that light. There are a ton of custom triples (Sinner, Okluma, McGizmo, etc), some of which can even have the Lux-RC driver. All those lights would compare fairly favorably with the BOSS. I happen to love the finish of the black BOSS. On the other hand I don’t always love bare metal lights, so the BOSS is a huge win there for me. That said, when the brass BOSS is released (soon, maybe?), it’s going to be hard to resist. (Brass is my jam.)
Conclusion
What I like
- Programming
- Satin finish is absolutely unlike any other finish I’ve had on a light
- Triple – I really like triples!
- I like the red secondary emitter (I’d love the amber!!)
- There are glow in the dark bits
- Love that there are two body options, even though they don’t come cheap
- The McClicky is very high quality
What I don’t like
- I don’t love forward clicked (I get it, but I still don’t love them)
- Four output levels with no extra mode groups is…. not many levels! Particularly if one is occupied by secondary emitter
- 4000K is a little warm on the XP-L HI
- Programming is finicky until mastered
Parting Shot
This probably fits better with the upcoming review of the Lumintop Torpedo 007, but I found it funny that that light fits perfectly inside the TorchLAB Boss. Yo dawg I heard you like flashlights….

Up Next
Notes
- I bought the BOSS 35 myself at full price. I was provided the 70 body at no cost in order to have a fuller review of the BOSS. Also the 70 I was provided was from extra stock that was unsellable due to slight irregularities in production (which can be seen in my photos). Not anything that bothers me or affects operation in the least but something Oveready wasn’t willing to sell.
- I have worked on this review here and there over the course of… months. So if it is a bit disjointed, I apologize.
- I tried to be thorough but there are certainly things I didn’t cover. For that I apologize, and I’m glad to answer any questions you may have. What I don’t know, I bet u/overeddity will be around to fill in.
- I have struggled with making this a 2 part post, but settled on this format. I hope it’s not overwhelming, and feel free to consume it as two parts. 🙂
AND FINALLY:
Dan from Oveready has agreed to do an AMA in r/flashlight! Dan is u/overeddity, and is one of the guys behind Oveready, and the BOSS. He’ll have great insight into any questions you may have about the BOSS! I’ve chatted with him a fair bit and he’s an astounding resource, and answers questions with a refreshing thoroughness. I personally can’t wait for the AMA. More details on that once this post is live, and we’ve nailed down a schedule with Dan.

Great Review! Thanks for all the detailed information.
LikeLiked by 1 person
Thanks Justin! It was challenging to write…. lots of info about the BOSS to consider. Still thinking if I’ll review the brass BOSS too….
LikeLike
Great review thanks. I’ve been re-reading it ever since I got my Copper Boss 35 last week. The programming of this light engine via optical is just awesome. 🙂
LikeLiked by 1 person
Yeah, I agree. I’m honestly quite taken with the BOSS. I now have two 70s and two 35’s…. (just 2 heads total though). Black aluminum combo, and brass combo, too. Love them.
LikeLike
Good choices in finish! I am EDC’ing mine and always will now. I program it from my iPhone so that means it can be done anywhere, ergo I can set the levels to what I need for where I am and what I am doing. The 371d LE is nothing short of stunning, the Lux-RC website is so good and the whole ‘light world’ agrees with that. Enjoy the combo 🙂
LikeLiked by 1 person
My line of work depends greatly on flashlights. I use one daily for at least a total of 5 hours a day. I am almost always off the ground about 50ft or more doing my work. If I go up to work and don’t have a flashlight I cannot do my job. I take at least 3 lights up. At least 2 sets of replacement batteries each.
All of that being said I would never pay $400 to $600 for any of these flashlights. I don’t think they would be worth their cost.
I go through many flashlights but I have a few that are over 5 years old. Dropped, dunked and abused greatly over those years and minus cosmetic damage they still soldier on. I have yet to find a light over $50 that is better than the ones I buy at costco.
The cost/value of these lights just doesn’t seem to match in my humble opinion. The switches always wear out at the worse time. The lenses all scratch up.
I would love to see a legit review where the reviewer actually buys the light and has no bias.
I have used so many lights in the last 20 years that I can honestly say that I have owned $2 lights all the way up to $200 lights and have yet to find one that lives up to its $200 price tag.
When I see a review from an honest source I might investigate further. Until then…It’s a bit of gear that has more swag value than field value for that price.
LikeLike
Randell, thanks for your reply. I’ve been mulling a reply for a while.
> All of that being said I would never pay $400 to $600 for any of these flashlights. I don’t think they would be worth their cost.
That’s just fine. I’m certainly not attempting to compel you to purchase one of these. You may be serviced perfectly by an under $50 light that you purchase from Costco. Again, perfectly fine by me and I’m not trying to compel you otherwise.
> I would love to see a legit review where the reviewer actually buys the light and has no bias.
Please note and as stated in the review, I did purchase the BOSS myself. I obtained an extra BODY at no cost. You may claim that my review is thus dishonest, but don’t indicate that am not someone who “actually buys the light”. The BOSS 35 is a complete, fully working light. The 70 body (which I received for free) is not, and required the head that I did buy.
It’s very possible that a light like this is not suited to you. Again that’s fine. I happen to love mine.
> When I see a review from an honest source I might investigate further.
You are seeing a review from an honest source. I take exception to your claim that this is anything but.
In fact I love my aluminum boss (seen in this review) so much that I purchased the brass combo.
So whatever you think about me receiving the 70 body seen here as a review sample, I liked this light enough to purchase my own combo. I hope that suits your need for an “honest evaluation” but regardless if it does or does not, I evaluated the light honestly, and I’m satisfied with what I have written above.
LikeLike