Preface
Official Specs
Versions
Price
Short Review
Long Review
  What's Included
  Manual and Packaging
  Build Quality and Durability
  Size
  Power
  User Interface and Operation
  Software
  Filament
  Prints
  Things from the microSD Card
Conclusion
  What I like
  What I don't like
Up Next
Notes
Preface
The truth is that I haven’t used a 3D printer before using this one, so there was quite a big learning curve for me. As a result I’ve had this item in for review longer than most items. But I’ve used it a lot, and can give my experiences and thoughts, which can possibly help you.
Official Specs and Features
Versions
There’s just one of these Nano printers, available in two colors (orange and white) and two power supplies (US and European). But the printer and parts are the same.
Price
Currently this printer is listed at $180, but I’d look for prices in the $150s. Here’s a referral link to the item at Gearbest. Buy the orange. (I’ll trade you my white for it!! 🙂 )
Short Review
This is a simple and useful 3d printer, great for a beginner and useful for small prints.
Long Review
What’s Included
- Easythreed Nano E3D 3D printer
- Power cable
- Computer connect (USB) cable
- Filament (PLA, 0.25kg)
- USB micro-USB card reader and card (with files)
- Bed scraper
- Philips Screwdriver


Package and Manual
The Nano arrives in a nicely printed box, with general specs and features printed. The box fits the printer very well, with no slop. GearBest has their inventory sticker on the box, of course.


The manual is entirely in English, and is very brief. I obtained most of the needed information from non-manual sources (including Youtube), when I had questions.
Build Quality and Disassembly
It’s worth taking note that the Nano arrives completely built. There are a few shipping pieces and a bunch of tape to remove, but there’s nothing to build. The build itself is fine. The upper supports (the white body, that is) could probably fit together more seamlessly, but they aren’t lose or sketchy in the least, and this is strictly a “looks” fit issue. The photo below shows two of the shipping pieces which must be removed before use. They’re green, in the back behind the bed.

Below you can see how the parts of the body don’t fit together absolutely seamlessly, but again, this does not cause any issues whatsoever with operation.

The two green shipping pieces are actually 3d printed pieces. Also included is a filament holder, which is attached (below), and is also 3d printed.


There’s a sticker on the bottom which gives some useful specs, namely regarding power needs.

The base of the unit has some rubber donut feet, which have kept the Nano very stable during all of my prints.

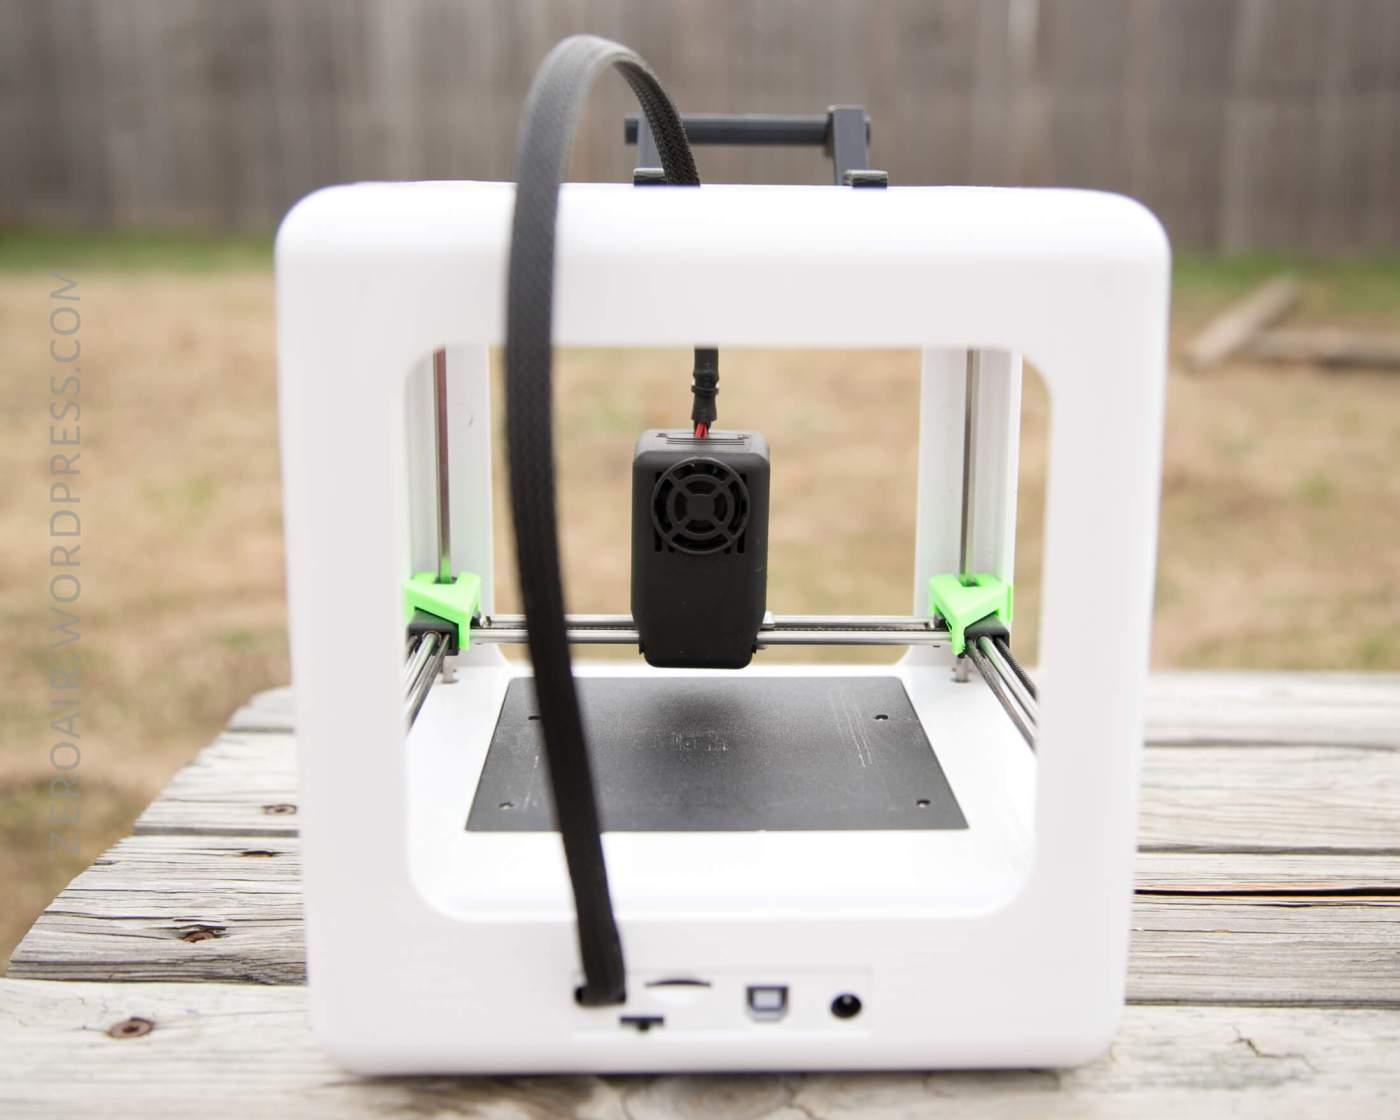
Inside the print area, things are simple but work well and are well built. The bed of the Nano is not mobile. This means that the print head must move away from the bed as the print advances. This happens by a series stepper motors and lead screws and a bunch of other stuff I don’t know anything about. But the stepper motors and lead screws allow the print head to move up and down and side to side with very fine control. These lead screws are very well fit into the body, and seem very sturdy.


The print head has a fan built in, and a 0.4mm nozzle. The print bed is stationary, but there are four screws, one in each corner, for leveling the bed. This is important, and a feature I took advantage of during my use of the Nano.
The back panel of the Nano has a few connections. There’s a barrel plug for power. There’s a micro-USB port, which is where I fed files to the printer. And there’s a female USB type B 2.0, which allows connecting directly to and printing from the computer. There’s a toggle switch which is used for feeding or retracting the filament, but is really only used in setup, or when switching filament.
Size
Officially the size is 18.80 x 18.80 x 19.80 cm. This is a small table-top 3d printer, with a correspondingly small print bed. Here’s the graphic by Easythreed:

There are two print cubes because the print head has more room when inside the body, but once the head gets to where it is in the photo above, the print dimensions shrink a little. Still this is a great size for many prints! And the footprint of the unit is quite small, too.
Power
Easythreed provides a very capable wall wart brick, which outputs 5A at 12V. That’s quite a bit of current, but with the heated areas on the printer, that’s needed.

I believe it’s possible to power the unit just over USB, but it’s not possible to print in this way. USB doesn’t provide enough current.
User Interface and Operation
Essentially there’s one button for operating the Nano. This button is on the front, and it’s backlit with a green LED. To be honest, this is the only print button I used. It’s possible to use this printer in a very advanced (computer connected and controlled) way, but I’ve opted for my first 3d printing experience to be the simplest. The way this option works is that a user loads a print file (.gcode) to the microSD card, and places that card into the printer (slot is on the back). Once the printer is warmed up press the button here on the front, and printing of the first print file in the root directory will print.

As far as I can tell there’s no way to make the printer print the second (etc) file in the root directory. I mitigated this issue by always having the file I wanted to print (and only the file I wanted to print) in the root directory. This really isn’t hard and never caused me any real difficulties.
Note that at least on my sample, the test files were actually misnamed. This caused quite a bit of confusion. The file labeled “heart” isn’t a heart – it’s a star. So when I thought I should be printing a heart and I didn’t, I was confused. Mac can load these files natively (though I do have XCODE installed, which may be a necessity), so once I looked at the file it was clear what had happened. Just bear this in mind when you’re printing for the first time.
I’ll cover more on how to get other .gcode files later in the review.

There are some other setup type things that count as “interface.” When installing filament for the first time or changing filament, the toggle must be manipulated. In the center (seen here) is the “normal” operating configuration. One direction is to get the filament to feed into the head, and the other is to retract the filament.
Also noteworthy is that the button on the front can do a few other things. It can pause the print (just press during a print). It can continue the print (just press when paused). It can stop a print (hold for >3s). It can retract the print head after a print (hold the button for many seconds and release, and the print head will raise and ‘home’ [home of sorts], up a CM or two.
Software
The included microSD card contains many files which the user might find useful. Unfortunately I can’t find a repository of these files anywhere, so carefully keep a copy for yourself somewhere (probably other than the microSD card).
The print software that’s included is called E3D Nano, and will only work on PC. It’s not the most refined PC software, but it does work fine.
Once the software is installed, open the program. I obtained .stl files from thingiverse, and the example vase I’m using below is from there. I just picked one at random, and as expected the default size is too large for the Nano, which can be noted by the fully red color of the model. To resize, just click “scale” and in the bottom left window, just lower one of the settings. It’s possible to adjust the dimensions independently, and also to keep the model with the same scale as original.


Once the model is scaled to an appropriate size for the Nano, the model will turn from blue to red. This means that the Nano should print the model. There could be some issues later depending on what kind of support structure you select, and I didn’t sort a way to make sure the support structure was always within the print bed (and those prints faulted). So basically don’t plan to print to the margins, unless you also don’t use any support structure.

It’s also possible to have a model in the software but not selected. In that case, the model is gray.

The top left bubble has some options. One of those is a little slicer, which will build the .gcode program for the printer. One-key makes this easy, but still adjustable – it’s possible to select Fast, Standard, and Optimized.

The other option, Custom, allows even more granular control over the print. See below for all these options. (Truthfully most of these mean little to me, and the One-Key served me well.)


When you’re satisfied with the settings, click ‘save data’ and the file will be built.

Here can be seen the print (bright blue) and support structure (red). In this case, the red doesn’t mean “off print bed,” it just means “this is cruft and will be cut away.”

Once the file has finished saving, this popup will pop. This is a tiny window and could cause some consternation. If you save and it then seems like the program isn’t responding? Look for this little window, and click “OK.”

It’s also possible to use the slicing software to see how the print will lay down (left, below) and also to look at any individual slices.


Among other things the software can do is manipulate the model in various, expected ways.


I believe, though I didn’t test it this way, that the E3D Nano software can be used for connecting to the printer and printing directly. This didn’t make sense to me – why tether a computer when printing from a file will be less dependent on a separate system, and also work as well or better? What happens if the computer sleeps? Or some other program starts hogging the processor? With using the flash drive, these concerns are irrelevant. If you do opt for this setup, you’ll need to load an (included) driver to your computer.
Another includes bit of software is Cura. Here’s exactly as far as I got with Cura, and since my printer isn’t shown here, and there’s no guidance on what I should do, this is where I stopped with Cura. Particularly since it seems that Cura does the same thing as the program I discussed already.
The manual states that it’s the Cura software which allows “online” (USB connected) printing.

Filament
Easythreed includes a bit of white PLA filament. It’s only 0.25kg, but it’s lasted me quite well.

One of the first things most people print for this particular printer is an arm for holding the filament spool. In the case of the item from GearBest, this is included!

1.75mm filament is required, and while GearBest states that only PLA is supported, Easythreed product page says that PLA and ABS are both supported (but this could be bad copy pasta on their part, as the actual copy refers to the “Mars” printer they also make.)
Prints
How to print has been covered above. What can you print? Well, lots of stuff! Below are two of the included files, at their default size. A vase, which I printed 4x, and the star (which was labeled “heart” in the file list). Prints are very consistent. Even the time taken is very consistent. Two of the vases have their raft left on just for demonstration – this comes off fairly easily.


Top view shows that yes, these vases aren’t perfect, but the print is very consistent.

Also I printed a few random things I found around the web.


The little disk was a mechanical keyboard keycap, which didn’t survive. One of the MX compatible stems broke. Unlikely this was due to print, but I’m not sure.


Included Software and Things
There are a number of items included on the microSD card. I’m going to try to include them all here, for future users. First of all, two videos. (Posting them to youtube allows me to keep them from taking up huge space in the .zip from the microSD card).
Next is a download of Cura software. The version included with my unit is 15.04.3, but I don’t find that software to be specific for this printer. With that in mind, I’d suggest that you just obtain the latest version from Cura themselves. (Also, 15.04.3 is still available there if you’d prefer to use it.)
There are two files I can’t see elsewhere on the web, and importantly, not on the EasyThreed website. (They have software – EasyWare – but it’s not for the Nano.)
So with all that said, here’s a link to what you need that isn’t included above. It’s a .zip archive, around 34mb, and includes the following items:

Even a couple of test prints! (The ones included originally, and shown in the review here.)
Hope that helps everyone!
Conclusion
This is a fun printer! If you decide it’s the right printer for you, buy it here.
What I like
- Small size
- Full package including filament and wall wart, etc
- Easy to use with the microSD card and one click printing
- Included software works well enough and is intuitive
What I don’t like
- Print bed isn’t large
- No way to obtain original microSD card files if they’re deleted
- There’s a fair amount of software that isn’t covered in the manual, and this makes a few things unclear.
- Prints are precise but not accurate – bases on the vases weren’t round, for example, and they should be.
Up Next
I have a few other things upcoming for review, but nothing just “on deck.” I have a lot of work to do!!
Notes
- This printer was provided by GearBest for review. I was not paid to write this review.
- This content originally appeared at zeroair.wordpress.com. Please visit there for the best experience!
- Whether or not I have a coupon for this light, I do have a bunch of coupons!! Have a look at my spreadsheet for those coupons. Note I’ve upgraded that sheet so that now, you may subscribe and get notifications when the sheet is edited!!

Hello,
I bought the printer because of your nice review 🙂
but sadly the files on the sd card i got were already corrupted and i can not use the printer now, do you maybe still have them and send them to me?
Best regards,
Julian
LikeLike
Yes Julian, I should still have them. Give me a day or so. Thanks!
LikeLike
Julian,
Have a look at the new section in this post, please:
https://zeroair.wordpress.com/2018/02/21/easythreed-e3d-nano-3d-printer-review/#software
Everything you need should be there now.
LikeLike
Hi thanks for the review. I bought one and the files were corrupted. Is it okay if I would ask where could I download the software? Thanks
LikeLike
Have a look at the new section in this post, please:
https://zeroair.wordpress.com/2018/02/21/easythreed-e3d-nano-3d-printer-review/#software
Everything you need should be there now.
LikeLike
Excellent review! I am thinking of getting one, is it ok if I use 1kg filament instead of 0.25, as my local retailers don’t have it in stock?
LikeLike
I actually never printed with anything but the stock filament! Sorry, I can’t help there.
LikeLike
OK, Thanks anyways
LikeLike
Oh, OK. Thanks anyway
LikeLike
Hi do i need the driver usb as i cant see it in the zip file you’ve included
LikeLike
Sorry, I really don’t know Michael.
LikeLike